crochet steek
i've been working on a seamless raglan--the body knitted bottom up, the sleeves top down. after completing the yoke with neck shaping from page 74 of Knitting Without Tears (efficient, easy to execute, but not quite as clean in appearance as other neck-shaping techniques), i unraveled the sleeve provisional cast-on and began knitting downwards. at this point, i felt like i was knitting blind. the neck opening was too small to try on, so no way to check whether the sleeves were long enough, wide enough, shapely enough, etc.

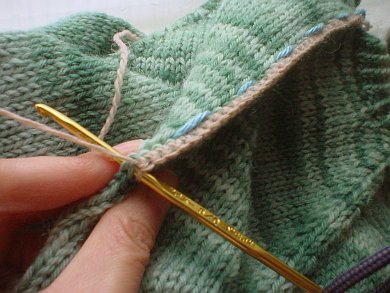
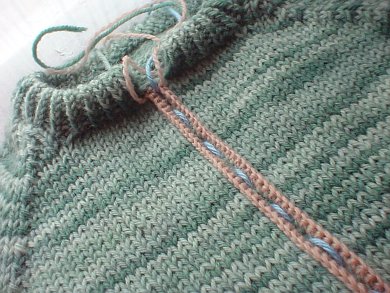
the small neck opening wasn't a problem because the plan was always to cardiganize with a steek (hence the guide thread through the center front stitches). this was in exchange for the comfort of knitting seamlessly and mindlessly around on the body. in order to check sleeve progress, it was time to steek. this would be a first (cutting up my own knitting, on purpose, while expecting it to stay in one piece. sounds nutty when spelled out like that.)... i reread what i had on crochet steeks, picked out some leftover and very feltable peruvian wool in fingering weight, and started crocheting:


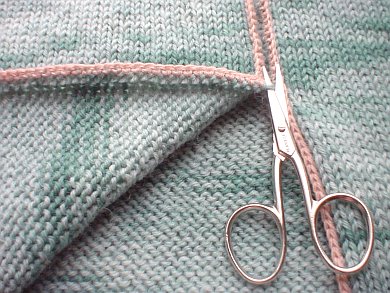
nothing left but to cut:

it's easy to find the ladder meant for cutting on a crochet steek, which means confidence that one is cutting the correct piece of yarn:


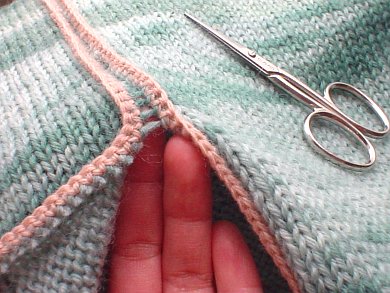
there were nerve-wracking and discomfiting bits of unraveling/loosening yarn at the bind-off edge (see dangerous strand indicated by red arrow), so i threaded the end of the crochet yarn through a needle and whipped a few stitches around that edge. other than that, things seem to be holding well. in fact, it's a very neat edge that naturally curls under. i kinda want to steek some more.

the small neck opening wasn't a problem because the plan was always to cardiganize with a steek (hence the guide thread through the center front stitches). this was in exchange for the comfort of knitting seamlessly and mindlessly around on the body. in order to check sleeve progress, it was time to steek. this would be a first (cutting up my own knitting, on purpose, while expecting it to stay in one piece. sounds nutty when spelled out like that.)... i reread what i had on crochet steeks, picked out some leftover and very feltable peruvian wool in fingering weight, and started crocheting:


nothing left but to cut:

it's easy to find the ladder meant for cutting on a crochet steek, which means confidence that one is cutting the correct piece of yarn:


there were nerve-wracking and discomfiting bits of unraveling/loosening yarn at the bind-off edge (see dangerous strand indicated by red arrow), so i threaded the end of the crochet yarn through a needle and whipped a few stitches around that edge. other than that, things seem to be holding well. in fact, it's a very neat edge that naturally curls under. i kinda want to steek some more.
Labels: seamless raglan, steek


23 Comments:
Thanks for this inspiration! I've still not steeked, but visions of lovely cardigans are pushing me in that direction. Yours is going to be a beauty!
By Anonymous, at 9:22 PM
Wow, that's amazing! You make it look so simple, I'm almost not afraid to try it now...
The sweater looks great too! What is that yar? It's so pretty!
By Lori, at 10:00 PM
That is so very cool! Beautiful too.
By Anonymous, at 10:33 PM
What everyone said and more! Thanks for the clear explanation and pictures.
By Anonymous, at 11:17 PM
Isn't steeking addictive? You just wander the house looking for knits to cut open.
Your photos are beautiful and illustrate crocheted steeks wonderfully.
By Jessica, at 11:19 PM
You're brave!! My first steek I must have machin stitched each side 4 times before I cut! Must learn this crochet business!
Beautiful sweater, I love the rose on green. Lovely.
By Anonymous, at 11:48 PM
That's brilliant. I don't actually have any plans to make anything with steeks, but that helps me understand the fascination. And I love the word 'cardiganize' :)
By Helen, at 3:29 AM
How clever! Thanks for sharing.
By Kelley, at 7:05 AM
Awesome! I love the photojournallism and can't wait to see how it all ends. That is looking like it will be a beautiful sweater. The subtle variegation in the yarn is lovely. I haven't tried steeking yet, but I know I'll be returning to your post for inspiration when I do ;-)
By Lydia, at 7:08 AM
how fabulous! i love watching people cut steeks. so what's the next step? do you sew under that edge and put in a zipper? i'm curious!
By spajonas, at 8:02 AM
That looks wonderful. I love that color too. Can't wait to see the finished product.
By Unknown, at 10:41 AM
this approach seems so much more do-able for me than machine stitching. I am a total sewing maching spaz!
By Luanda, at 5:51 PM
I'm putting in a vote for "cardiganize" as Word of the Year. That was a great tutorial - thanks! The crochet in your version is a lot more heavy-duty and crochet-like than what I did for my Fishtrap Aran, but it certainly looks like it will be secure!
By Sarah / Blue Garter, at 7:01 PM
Impressive! I must get the nerve to try steeking...I really like the crochet effect much better than the sewn technique I've read about. I've tried neither at this point. Great job...thanks for sharing with us.
By Nonna Rose, at 7:30 PM
Well done! Thanks so much for documenting the process for us. This is truly an inspiring idea.
By MJ, at 4:59 AM
What a fantastic post!!! Thanks so much for sharing all the details, step by step - I got a little goosebumpy over it all. (doesn't take much to thrill us, does it??)
:-)
By Anne K., at 1:12 PM
thanks for all the kind comments, everyone! i'll be a happy knitter if this can tempt some of you to steek. it's satisfying--like performing a magic trick--and surprisingly straight forward. so satisfying in fact, as Jessica mentioned, it's addictive. so go to it if you are pondering.
thanks also for appreciating "cardiganize" because sweater words are verbs for knitters! they are something we do. :)
Loribird: the yarn is Araucania Nature Wool. it's vegetable dyed (by a women's coop in Chile, i believe). the colors are beautiful.
Gleek: i want button bands, so i'll be picking up stitches along the steek. right now, things seem to be holding so well, i don't think i'll stitch the open edge down. it's supposed to roll in neatly once stitches are picked up to create a clean edge. i hope that's what will happen.
Sarah: this version of the crochet steek is the only one i've read about. it is nice and secure, but i'm very curious for details about the version you did.
thanks again, everyone!
By Anonymous, at 3:35 PM
Thank you very much for the tutorial on crocheted steeks. I have never had the courage to cut my work until now. I shall begin a Fair Isle cardigan today.
Your work is gorgeous.
By Anonymous, at 6:22 AM
Wow, what an amazing photo tutorial! Perhaps a bit of a dumb question but what happens once you've cut through? Do you unpick the crochet edge and pick up the stitches on your original knitting to work whatever edging you want on your cardi? Or does the crochet line become the edging and you pick of stitches from it?
By Anonymous, at 7:19 AM
Wow, that's fantastic! Thanks for all the close up pics. It makes me less afraid to steek.
By Violiknit, at 7:32 PM
This is a really wonderful technique and I think I will use it sometime. I've "cardiganized" many sweaters and still tend to hyperventilate as I cut into weeks or months of knitting. However, it's well worth learning how to do it, especially for 2 color knitting. Incidentally, while in Costa Rica and with no sewing machine handy, I discovered when using Shetland wool knit to a tight guage you can actually cut the steek without any sewing because it won't unravel. I read this in a book but tried on a swatch to prove it to myself. To clarify for those who haven't steeked, you generally pick up new stitches in a row a few stitches in from the edge and knit the band in the direction perpendicular to the rest of the knitting. You can sew over the folded over edge to prevent unraveling. Of course, if you do the crochet steek, there will be no unraveling. Very cool.
By Anonymous, at 6:39 PM
oooh...what a fab and exciting way to do a cardi...I want to knit a top down raglan cardi and cut it up the front now! Just going to read your added bit now!
By picperfic, at 2:45 AM
It looks very neat! Thanks for sharing.
By Sahajo - S. Müller, at 9:13 AM
Post a Comment
<< Home